The Perfect Travel Shot: Step-by-Step Guide to Erasing Photobombers from Vacation Photos
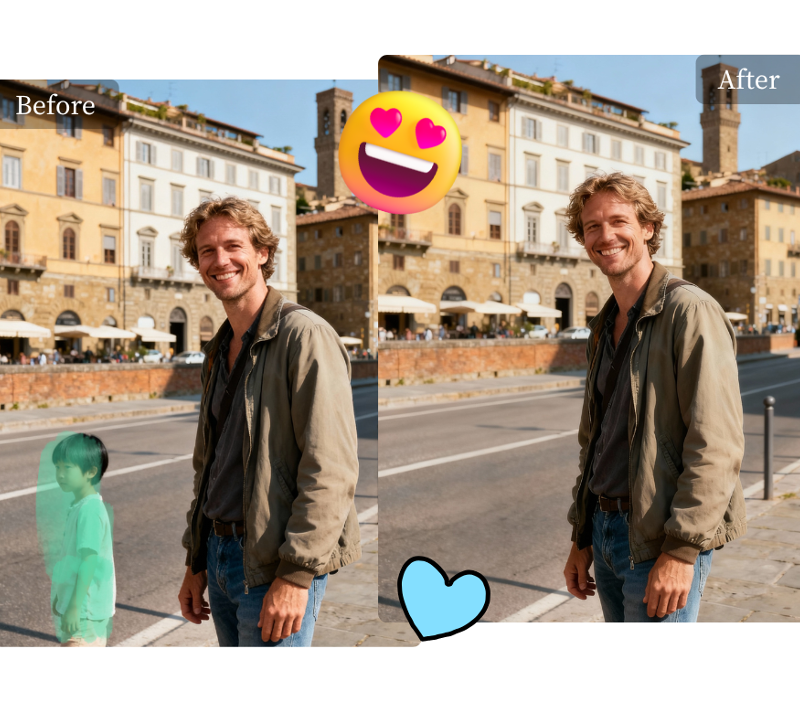
You framed the perfect shot. The lighting is magical, the smiles are genuine, and the background is breathtaking. But when you look at the photo later, you see it, a stranger walking right through your perfect moment. A stray tourist, an accidental arm, or an unwanted car can easily spoil an otherwise priceless memory. In the past, fixing this meant hours of work with complicated and expensive software.
Fortunately, technology has made photo editing much simpler. You no longer need to be a graphic designer to rescue your favorite pictures. With the right tool, you can remove unwanted people and objects in just a few clicks, leaving you with a flawless final image. The Magic Eraser offers a powerful yet simple way to clean up your photos and make your memories picture-perfect. This guide will walk you through every step of the process.
How to Remove a Person From a Photo: A Step-by-Step Guide
Erasing distractions from your photos is a straightforward process. By following these simple steps, you can quickly clean up your vacation pictures, family portraits, or any other image that needs a little touch-up.
Step 1: Upload Your Image
The first step is to get your photo into the editor. Navigate to a Free AI Image Editor and locate the upload button. You can typically drag and drop a file directly onto the webpage or click a button to browse the files on your computer or phone. The tool supports common image formats like JPG and PNG, so you shouldn’t have any trouble getting started.
Select the picture you want to edit from your gallery. Once you choose it, the image will load directly into the editing interface, ready for you to work on. Make sure you are using a high-quality version of your photo for the best possible results. A clear, sharp image gives the AI more information to work with when filling in the background.
Step 2: Select the Photobomber
Once your photo is loaded, you’ll see a brush or marker tool. This is what you will use to highlight the person or object you want to remove. Simply click and drag your mouse or finger over the entire area of the distraction. It’s like using a digital highlighter to paint over the photobomber.
Be thorough in this step. Make sure you cover every part of the person you want to erase, including their shadows. If you only select part of them, the tool might leave behind a stray leg or arm. Don’t worry about being perfectly neat, but do ensure the entire unwanted element is covered by the highlight.
Step 3: Click Erase and Let the AI Work
After you have completely marked the photobomber, find and click the “Erase” button. This is where the magic happens. The tool’s advanced AI gets to work, analyzing the pixels surrounding your selection. It intelligently identifies the background pattern, whether it’s a sandy beach, a brick wall, or a blue sky.
The AI then reconstructs the area where the photobomber used to be, seamlessly filling it in with the correct background. This process usually only takes a few seconds. The technology is designed to create a natural-looking result that blends perfectly with the rest of the image, making it appear as if the unwanted person was never there in the first place.
Step 4: Download Your Cleaned-Up Photo
Once the AI has finished its work, your new, photobomber-free image will appear on the screen. Take a moment to review it. Zoom in and check the area you edited to make sure everything looks clean and natural. If you notice any small imperfections, you can simply repeat the process on that tiny spot for an even better result.
When you are satisfied with the final image, click the “Download” button. The edited photo will be saved to your device without the distracting element. You now have a perfect vacation photo ready to be shared with friends and family or printed for a photo album.
Tips for a Perfect Result
While the process is simple, a few extra tips can help you achieve professional-level results every time.
Zoom In for Better Accuracy
For precise edits, especially when a photobomber is close to someone you want to keep in the photo, use the zoom function. Zooming in on the area allows you to be much more accurate with your selection brush. It helps you avoid accidentally marking a part of your subject, which could lead to a distorted or blurry result. Precision is key to a seamless edit.
Adjust the Brush Size
Most object removal tools allow you to change the size of your brush. This is an incredibly useful feature. Use a larger brush to quickly cover a large distraction in an open area, like a person on an empty beach. Switch to a smaller brush for finer details, such as removing a stranger’s hand that is near your friend’s shoulder. Matching the brush size to the task gives you greater control.
Use Multiple Passes if Needed
Sometimes, the AI might leave behind a small, blurry artifact or a slightly mismatched pattern on the first try, especially with complex backgrounds. Don’t worry if this happens. The best approach is to make multiple small passes. Simply use the eraser tool again on the specific area that needs a touch-up. This iterative process often produces a much cleaner and more believable result than trying to fix everything in one go.
Common Mistakes to Avoid
Knowing what not to do is just as important as knowing what to do. Avoid these common errors to ensure your photo edits are always successful.
Rushing the Selection
One of the most frequent mistakes is rushing the highlighting step. If you don’t completely cover the unwanted person or object, you’ll be left with remnants in your final image. Take your time to carefully paint over the entire distraction. A few extra seconds of careful selection will save you from having to redo your work later.
Using a Brush That Is Too Large
While a large brush is great for big, open spaces, using one near the edges of your main subject is a recipe for trouble. A brush that is too big can overlap onto the person you want to keep, causing the AI to remove parts of them or blend the area incorrectly. Always reduce your brush size when working near important details.
Ignoring Complex Backgrounds
Removing a person from a simple background like the sky or a plain wall is easy. Removing them from a highly detailed or patterned background, like a bustling city street or a patterned carpet, is more challenging. If the background is very complex, be prepared to do a few touch-ups. Making smaller, more focused selections can help the AI generate a more accurate fill.
Conclusion
A stray photobomber no longer has to ruin your favorite vacation photos. With powerful and accessible online tools, you have the power to clean up your images in a matter of minutes. By following the simple steps of uploading, selecting, erasing, and downloading, you can remove any unwanted distraction and perfect your pictures.
Remember to use our tips, like zooming in for precision and adjusting your brush size, to get the best results. By avoiding common mistakes, you can ensure a seamless and professional-looking edit every time. Now you can confidently capture memories, knowing that you can always fix any unexpected interruptions later.