
5 Ways to Transfer Files from Mac

Transferring files from your Mac isn’t hard. You can send documents to coworkers, move photos to an external drive, or sync across devices. MacOS gives you the tools to do this easily, including using built-in features like AirDrop, file sharing, and iCloud Drive, as well as external tools like Migration Assistant and cloud storage services
While using the built-in macOS tools makes transfers easier within the Apple ecosystem, you’re not limited to them. There are multiple other ways to transfer files from a Mac, and the best option depends on where they will end up—another Mac, a Windows PC, cloud storage, etc.
Some methods work without the internet, too, and are great for large files, while others feel more convenient for quick one-off sends. Using the right method or tool can save time and reduce errors, especially when sending sensitive or important data.
Here are five simple ways to transfer files from Mac without any hassle or extra setup.
1. Use AirDrop for Instant Transfers
When you need to move files between two Apple devices, nothing comes closer to AirDrop. It uses Bluetooth and Wi-Fi to transfer files directly between two devices without requiring them to be plugged into each other or the internet.
Here is how to transfer files from Mac using AirDrop:
- Open Finder and select the file you want to send.
- Click Share > AirDrop and select the recipient’s device from the list.
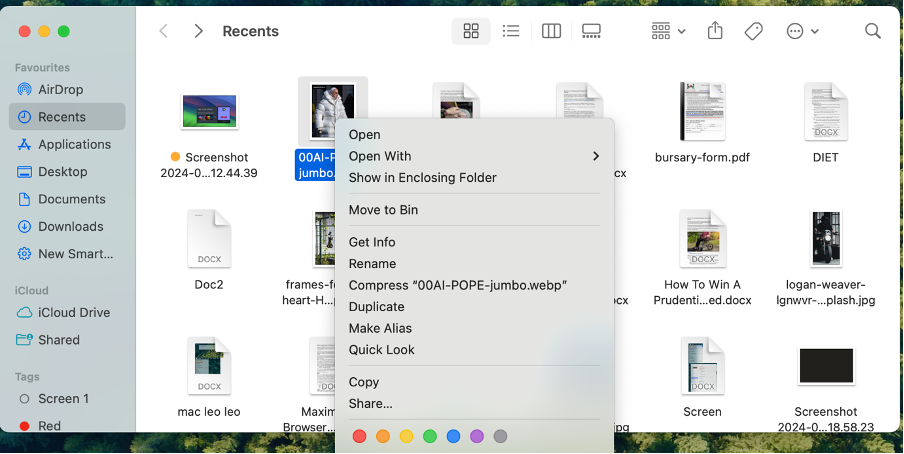
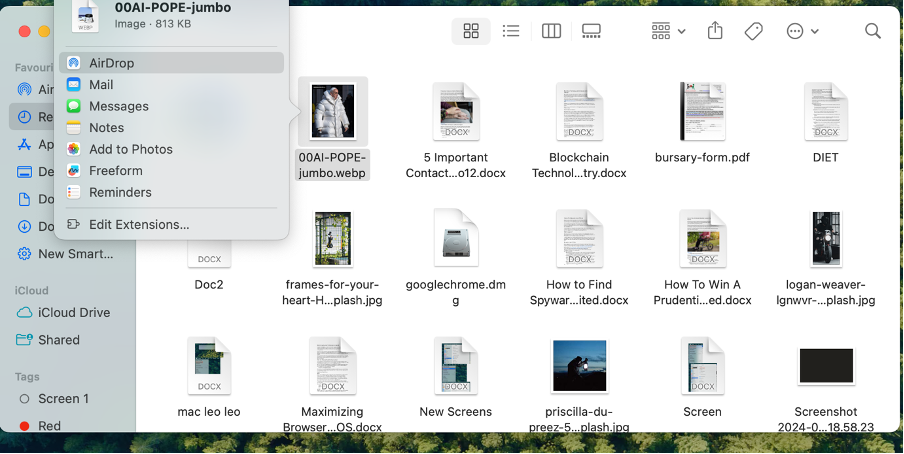
Both devices require Bluetooth and Wi-Fi to be enabled and within range. AirDrop works with documents, images, videos, and more. It’s quick, and your files aren’t compressed to lose their quality.
AirDrop is perfect if you need to send a couple of files between Macs or iPhones/iPads. However, it may not be the best way to transfer bulk files from a Mac to a non-Apple device.
2. USB Drives: Reliable and Simple
USB flash drives or external hard drives are still one of the most reliable ways to move files across devices. They’re especially useful when working between operating systems, like transferring files from a Mac to a Windows PC.
To move files from Mac using a USB Drive:
- Plug the drive into your Mac.
- Drag the files you want to the USB drive in Finder.
- Eject the drive correctly before unplugging it.
- Plug it into the other device and transfer the files.
But a quick heads up: Macs often make a .DS_Store file to remember elements of your Finder folders. It keeps metadata stored in relation to viewing modes and sorting order.
They don’t affect your files, but if you’re sending the USB to someone else, they might be confused. To avoid this, you can remove DS Store files before sharing or use Terminal commands to stop your Mac from writing them to external drives.
USB drives are great for file backups, sharing large folders, or keeping physical copies. Since they don’t require Wi-Fi or Bluetooth, you can use them to transfer files offline or in an area with slow internet.
3. Share Through iCloud Drive or Another Cloud Service.
With the world rapidly embracing cloud computing, MacBooks lead the way in ensuring your files are well-kept and stored in iCloud. The best part is that if you have files in cloud storage, you can transfer them to another location or another device through an iCloud drive or a cloud service.
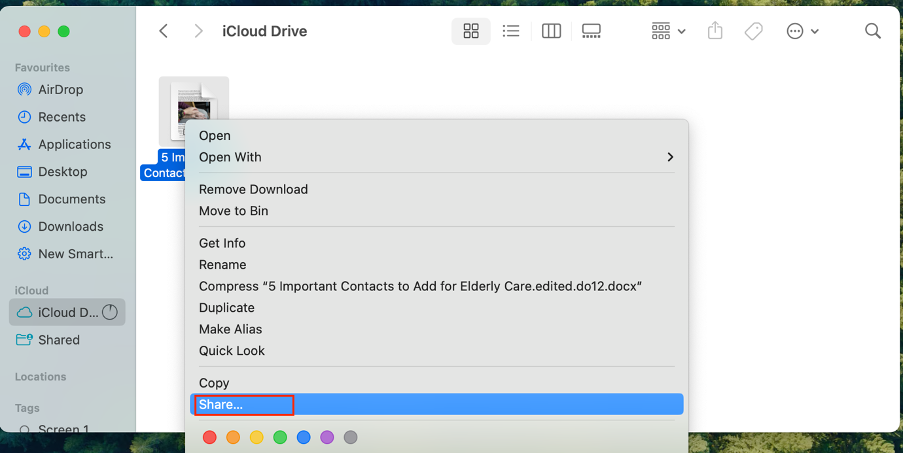
Just open Finder on Mac and drag the files you want to transfer into the iCloud Drive folder. You can sign in with the same Apple ID on another device to access these files.

You can also share files with other people:
- Right-click the file, and then click Share.
- Choose how you’d like to send the link.
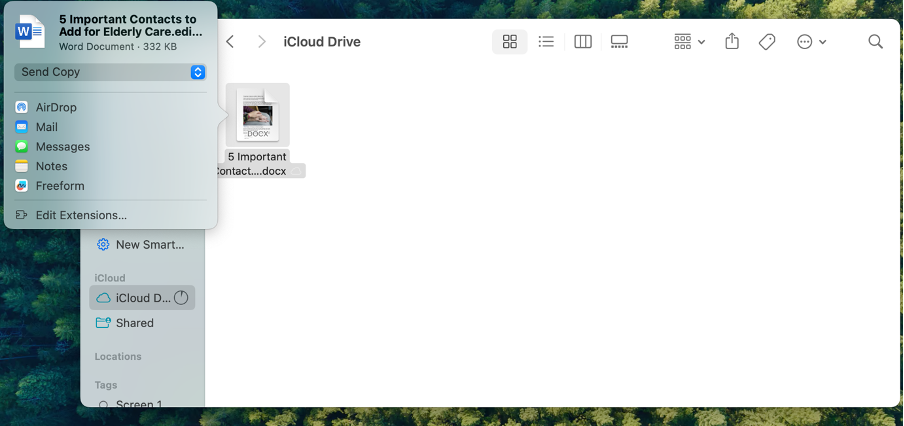
Other cloud services, such as Google Drive, Dropbox, and OneDrive, work well. These options are more universal for sharing large files or when you need access on a Windows PC.
Cloud storage requires an internet connection and available space. If you’re low on bandwidth or offline, opt for a physical transfer method.
4. Use File Sharing Over Wi-Fi
File Sharing is built into macOS and lets you transfer files between Macs over your local network. You don’t need extra software or the internet—just Macs on the same Wi-Fi.
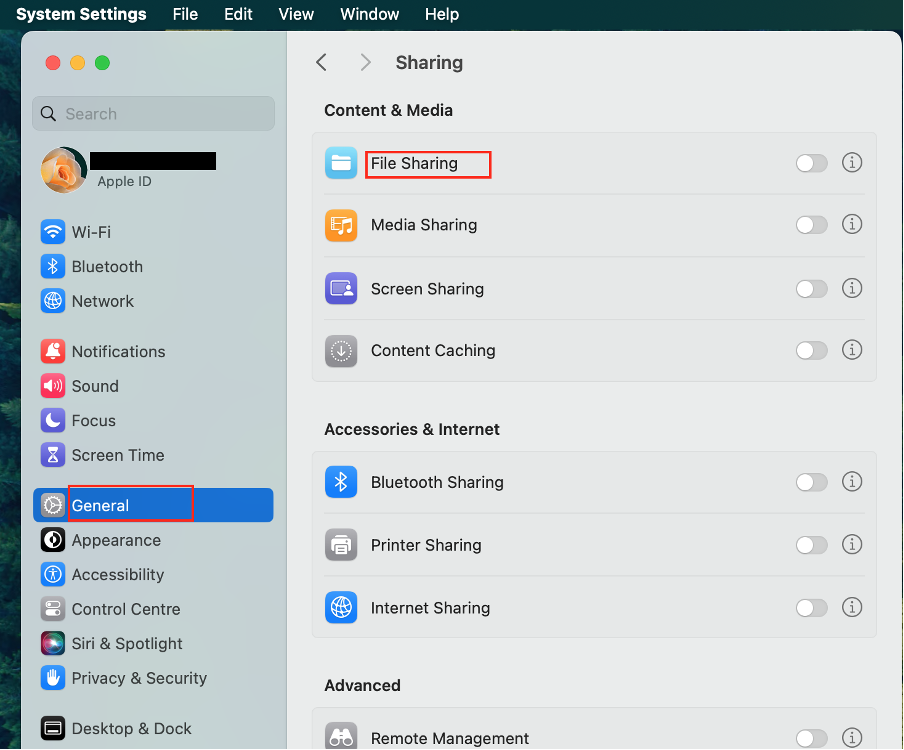
Here is how to turn on file sharing on Mac
- Go to System Settings > General > Sharing.
- Toggle on File Sharing.
- Add the folders you want to share and set permissions.

On the other Mac:
- Open Finder and click Network in the sidebar.
- Select the Mac with File Sharing enabled.
- Connect using your login credentials.
This is the best method for quickly transferring an entire folder or directory. The transfer rate will depend on your Wi-Fi connection. For example, the transfer may take longer than expected if you have a slow connection or both Macs aren’t close to the router.
5. Send Files via Email or Messaging Apps (for Small Files)
Sometimes, you want to transfer one file from Mac quickly, but email still does the job. Attach your file to a message and send it.
But consider this:
- Almost all email services have a file size limit (typically around 25MB).
- For larger files, use WeTransfer or Dropbox links.
You can also use messaging apps like Slack, WhatsApp (via the web), or the Apple Messages app to send files. These are great for quick sharing, but they compress images and videos. So, if quality matters, use AirDrop or a USB drive instead.
Final Thoughts
Transferring files from a Mac can be as simple as drag-and-drop or a quick network share setup. Out of the box, AirDrop is your go-to for device-to-device transfers. USB drives are basic and work with Windows users, while Cloud storage is modern and convenient, especially if you work across locations.
Choose the method that fits your file size, target device, and how often you’ll transfer. Most of these methods become second nature after using them a time or two. Whether you’re sharing work, backing up data, or organizing files across systems, each file-sharing method above will get it done without extra hassle.